When it comes to live streaming, especially for events like sports or esports, having a dynamic, professional scoreboard overlay is essential.
My Composition is a key feature within YoloCast’s Overlay Lab, designed to let you create fully customized overlays for your live streams. If you’re unfamiliar with Overlay Lab, I recommend reading this guide: What is YoloLiv Overlay Lab and How to Use it?
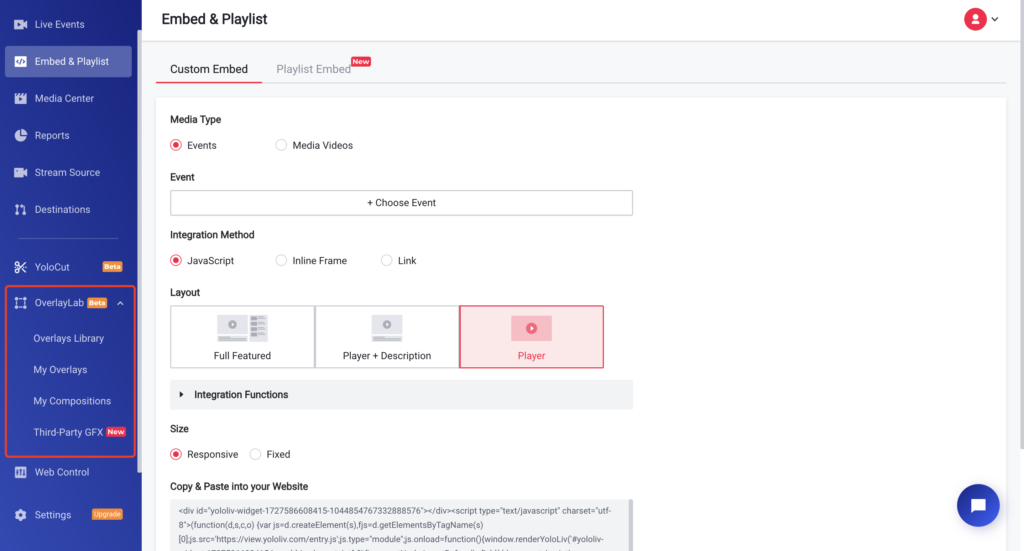
Before diving into how to create a custom scoreboard, let’s briefly introduce the Overlay Lab navigation bar to help you understand its layout:
- Overlay Library: This section includes nearly a hundred pre-designed overlay templates. These templates cover a range of overlay types, such as scoreboards, countdown timers, and lower thirds. It’s a great starting point if you want ready-made overlays for your streams.
- My Overlay: When you select a template from the Overlay Library, you’ll need to add it to My Overlay before syncing it with your YoloBox. My Overlay also serves as the control center for your overlays, allowing for basic edits like updating team logos or team names on a scoreboard overlay.
- My Composition: In My Composition, you can create fully custom overlays from scratch or add templates from My Overlay for deeper, more detailed editing. It’s here that you have the freedom to build a completely unique scoreboard to suit your event’s needs.
- Third-Party GFX: With this feature, you can now easily and quickly import web URL overlays directly from YoloCast to YoloBox Ultra. To learn more bout Third-Party GFX, please check the blog: How to Use the Third-Party GFX Feature on YoloCast? A Comprehensive Guide.
In this blog, we’ll focus on My Composition and show you how to create a custom scoreboard from scratch, giving you full creative control over the visual experience of your live stream.
Understanding the Overlay editing Interface in My Composition
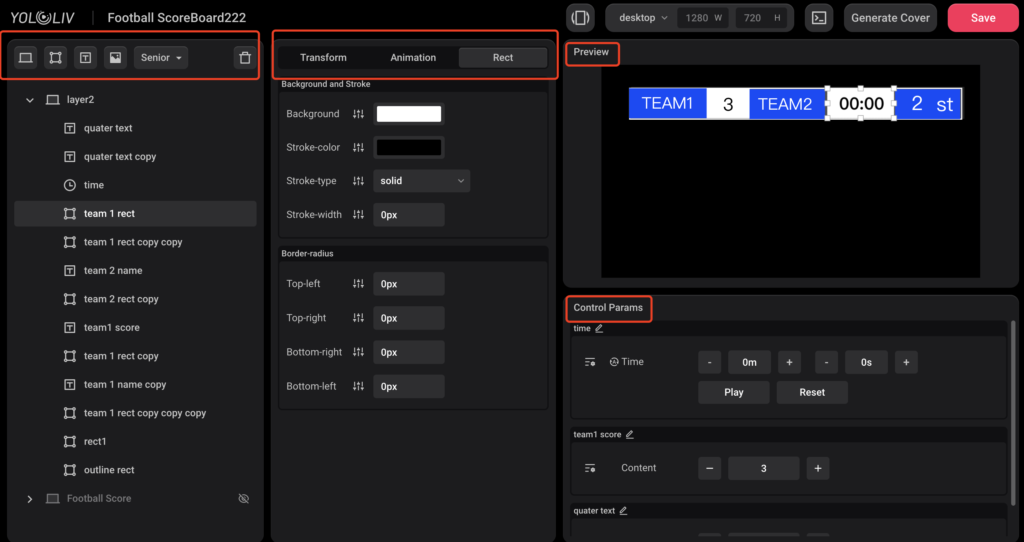
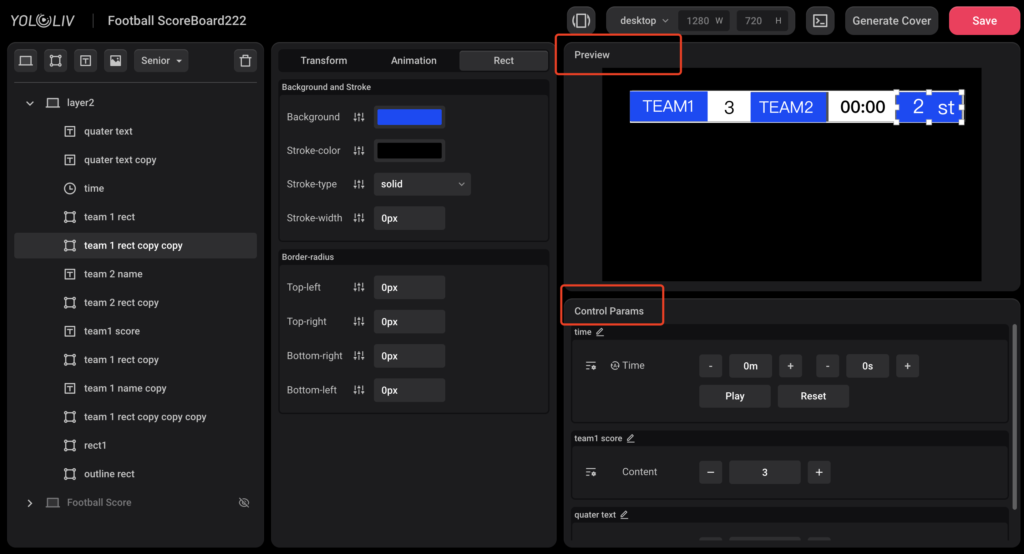
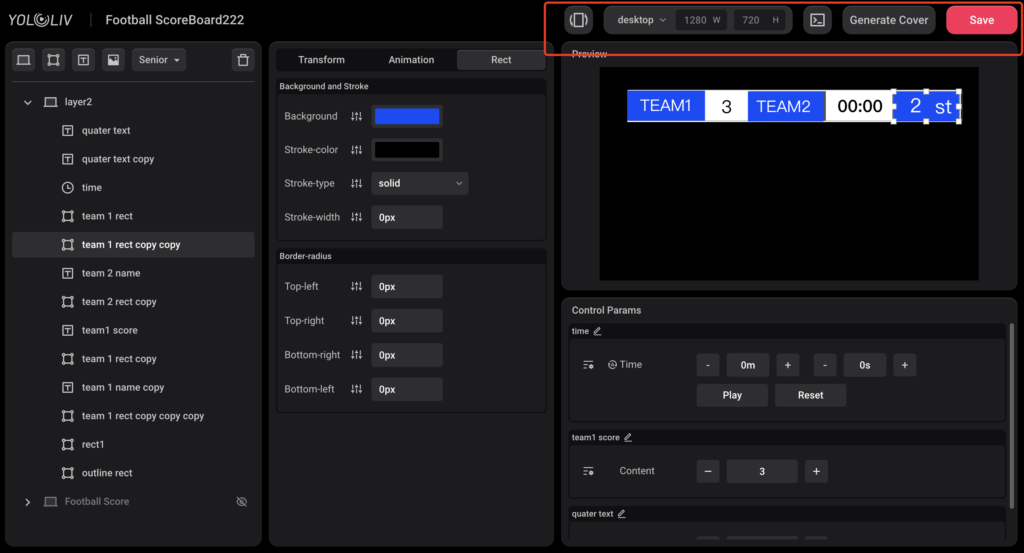
Before starting to create your custom scoreboard, it’s important to get familiar with the Overlay Editing interface in My Composition. It will be very helpful for the later creation of custom overlays. The overlay editing interface is divided into three main sections:
- Left Sidebar: This is where you create, edit, and delete the layers that make up the overlay.
- Middle Panel: This is where you adjust the parameters for each layer, such as modifying the layer color and the text in the text box.
- Right Sidebar: This is where you preview your final overlay and allows you to control parameters like score updates and timers.
Now that you understand the basic layout, let’s dive deeper into each section.
Left Sidebar: Key Features and Tools
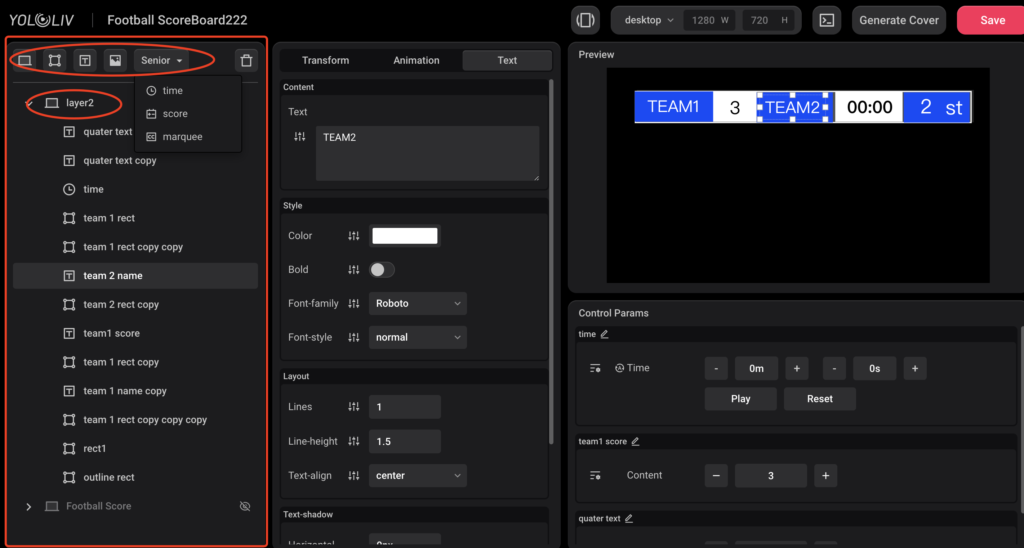
The Left Sidebar contains essential tools you’ll use to create the various elements of your scoreboard.
- Layer: Each layer represents a single element of your overlay, such as text, shapes, or images. A complete scoreboard can be made up of multiple layers working together.
- Rect (Rectangle Tool): Use this tool to create rectangular shapes, which will form the foundation of your scoreboard’s layout.
- T (Text Tool): This tool allows you to add text to your scoreboard. Use it for static text like team names or dynamic data like score updates.
- Image Tool: Upload and insert custom images into your overlay, such as team logos or sponsor graphics.
- Senior Dropdown Options:
- Time: Add a real-time clock or countdown timer to your overlay, perfect for sports or timed events.
- Score: A dynamic text field specifically for tracking scores that can be adjusted during the stream.
- Marquee: This option lets you create a scrolling text banner, ideal for showing live updates, sponsor messages, or player stats.
Middle Panel: Adjusting Layer Parameters
When you select any layer, the Middle Panel allows you to adjust and customize its appearance.
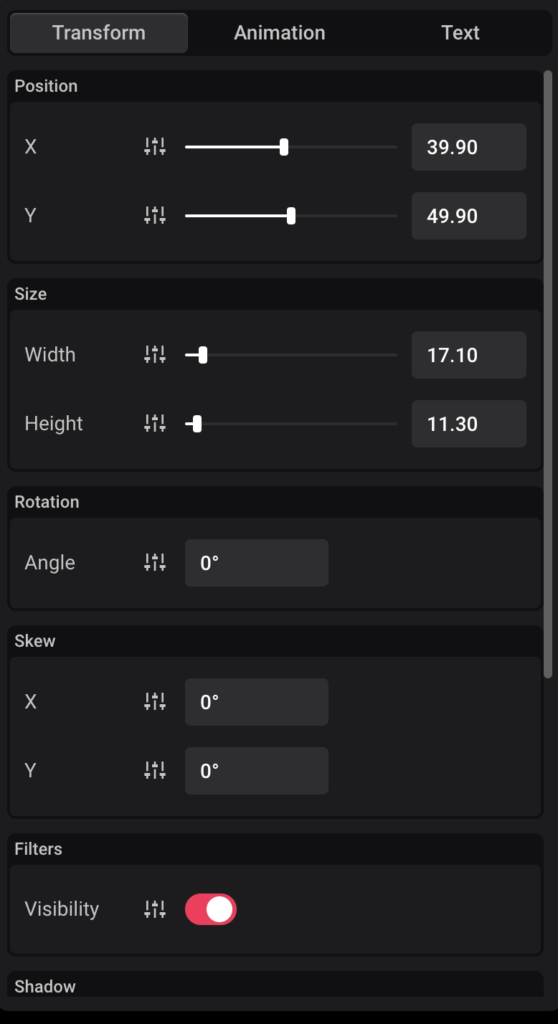
- Transform Settings:
- Position: Adjust the X and Y axis to move the layer precisely where you want it on the scoreboard. Suppose you want to adjust the position of the entire scoreboard. In that case, you can select the layout that makes up the scoreboard from the Left Sidebar, then move the X and Y axes in the Position settings to reposition the scoreboard.
- Size: Resize your layer by adjusting its height and width, or input exact dimensions for more accuracy.
- Rotation: Rotate the layer by entering a degree of rotation, perfect for slanting text or images.
- Skew: Tilt the layer horizontally or vertically by adjusting the skew angle.
- Shadow: Add a shadow to your layer to give it more depth, adjusting parameters like opacity, color, and distance for a polished look.
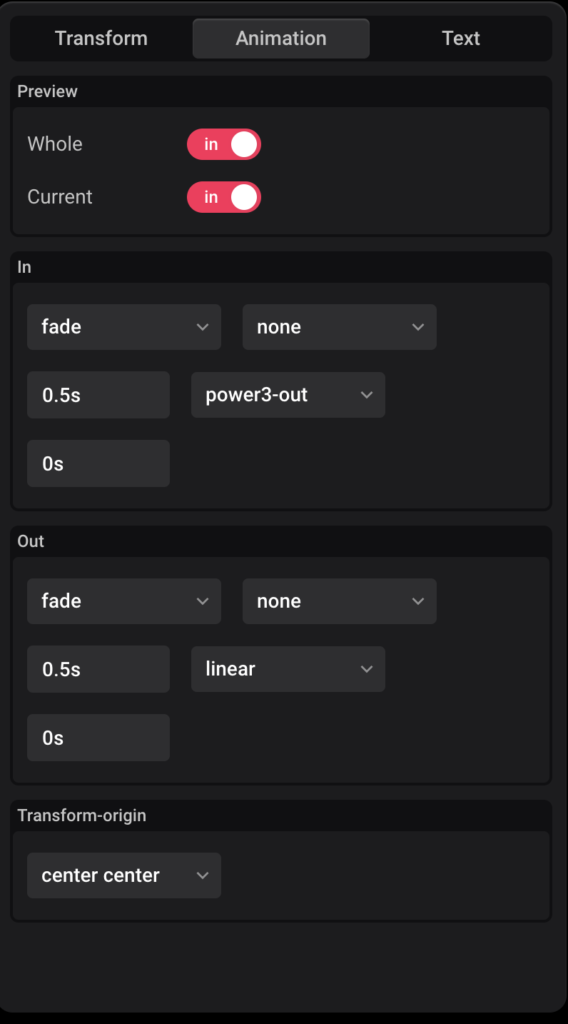
- Animation Settings: Add animations to layers so they transition in or out with effects like fading or sliding. This can make your scoreboard feel more dynamic.
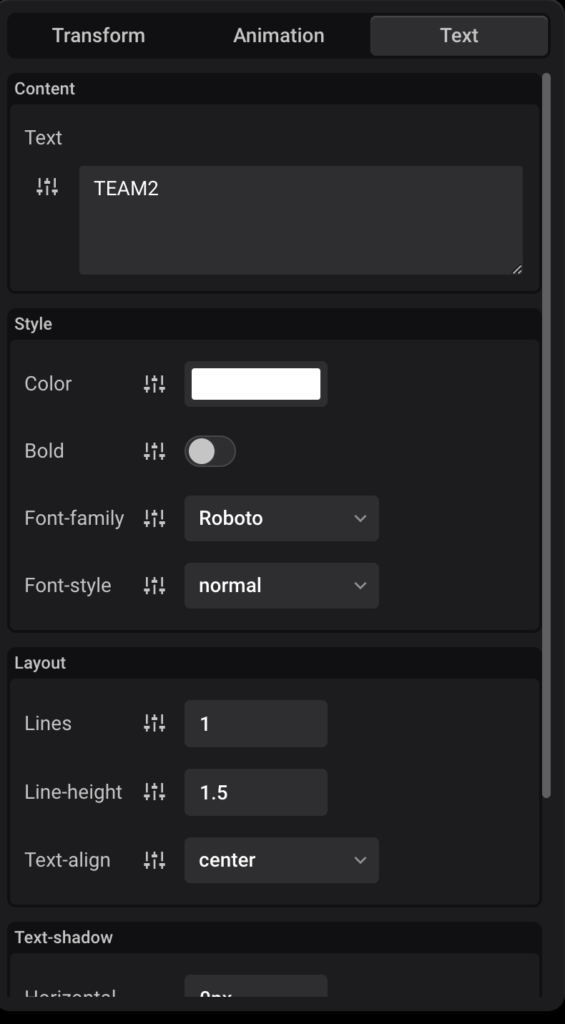
- layer Parameters: For the Text layer, you can customize the content, adjust styles, modify the layout, and change shadow effects to fit your design needs. For the Rect layer, you can customize Background and Stroke, Border-radius here, this section is where you adjust the layer Parameters.
Right Sidebar: Overlay Preview and Control Parameters
The Right Sidebar contains two critical sections:
- Preview Section: This provides a real-time view of your overlay as it will appear on the live stream. It’s useful for making sure everything is aligned and visually appealing.
- Control Params: This section allows you to control real-time variables, such as score changes or timer updates, during your stream. For example, if you add a score layer, you can manually adjust it here as the game progresses. You can test and edit the params control here before saving.
Top Toolbar Features
The Top Toolbar provides several key functions for managing your overlay:
- Save: Always save your customized overlay once you’re happy with the design, so it’s ready for future use.
- Overlay Display Size: Adjust the display size to fit different screen formats, like desktop, tablet, or mobile, ensuring your scoreboard looks good on all devices.
- Edit by Code: For advanced users, this feature allows you to tweak the overlay via code for finer control over the design.
- Generate Cover: Generate a cover image for your stream based on the overlay design.
Step-by-Step Guide to Creating a Customized Scoreboard
Now that you’re familiar with the interface, let’s walk through the steps to create a custom scoreboard for your stream.
Step 1: Brainstorm Your Scoreboard Design
Start by thinking about the layout and structure of your scoreboard. YoloCast offers templates for sports like football, baseball, and soccer. You can select a template, then Add to My Overlay and Extract to My Composition to use it as a starting point or inspiration for your own design.
Step 2: Create a New Layer
To begin, create a new layer using the Layer tool. Each scoreboard starts with a base layer, typically a rectangle that will serve as the background for your scoreboard elements.
Step 3: Add a Rectangle as the Foundation
Use the Rect (Rectangle Tool) to draw a rectangular box that will act as the base for your scoreboard. This is where you’ll place other elements like team names, scores, and timers.
Step 4: Add an Outline for Depth
To give your scoreboard a more polished look, add an additional rectangle layer around the original one to act as an outline. You can change the color of this outer rectangle to give your scoreboard a 3D or shadowed effect.
Step 5: Add Color-Coded Rectangles for Teams, Scores, and Time
Next, add more rectangles to separate different parts of your scoreboard. For instance, you could use one color to represent the home team, another for the away team, and different sections for the score, game time, and round information.
Step 6: Insert Text and Numeric Layers for Data
Use the T (Text Tool) to add team names, scores, and other relevant text. You can customize the font, size, and color to match your brand. You can also add Score or Time layers from the Senior Dropdown for dynamic elements that can be adjusted in real time.
How to Add Adjustable Data Layers with Control Params
The score’s number is built on a Text layer. However, while Text layers are typically static, the score needs to change dynamically with the game. So, how do you create dynamic numbers? To create dynamic score updates, follow these steps:
- Select the Text layer containing the numbers.
- Go to the right side of the Middle Panel, where you can adjust the text parameters.
- Click the adjustment icon next to the text box and select Add a Control Parameter.
- In the Control Params section on the right, adjust the properties. A noteworthy feature is the Immediate Update option. When enabled, scores will automatically update without needing to click manually.
Step7: Previewing and Testing Your Custom Overlay
Before you go live, use the Preview Section to check your scoreboard’s appearance and functionality. Make sure the scores update in real-time, the text is readable, and all the elements are aligned properly.
Step8: Saving and Exporting Your Custom Scoreboard
Once you’re happy with the design, don’t forget to Save your overlay. If you want to import it into your YoloBox, you need to add it to My Overlay.
Once you’re done editing the control parameters, your dynamic numbers will be ready. You can apply the same steps for creating dynamic timers.
Keyboard Shortcuts for Efficient Workflow
A quick tip to speed up your design process: you can quickly delete any layer by selecting it with your mouse and pressing Delete on your keyboard. This makes it easy to remove unwanted layers without navigating through menus.
Conclusion
Creating a customized scoreboard with YoloCast’s My Composition Overlay is a straightforward process once you familiarize yourself with the tools and interface. Whether you’re designing for a football match or an esports tournament, you can craft a scoreboard that enhances the viewer experience and gives your stream a professional look. Now that you know how to use the interface, it’s time to start experimenting with your own scoreboard designs!
8,634 total views, 11 views today

Hailey, a Customer Success Specialist at Yololiv, she brings immense enthusiasm to assisting users in understanding the various features of YoloCast and resolving any usage-related issues they may encounter. Alongside her support efforts, she also curates articles sharing tips, troubleshooting advice, and other helpful insights to enhance users’ experience with YoloCast.

