Live streaming pre-recorded videos on YouTube Live is an effective way to engage your audience. This approach allows creators to share high-quality, edited content while simulating a real-time experience for viewers. With tools like YoloCast, you can upload pre-recorded videos and stream them as if the video is live, eliminating the stress of real-time performance. It’s the perfect solution for YouTube scheduled events, letting you plan live sessions without being physically present. Additionally, YouTube Studio provides essential settings to help manage your YouTube broadcast efficiently.
YoloCast integrates seamlessly with YouTube, making it easy to stream video to YouTube Live in just a few steps. If you want to expand your reach further, platforms like YoloCast allow simultaneous streaming across multiple platforms.
In this blog, I’ll guide you through the process of using YoloCast to stream a live video on YouTube, ensuring a smooth and professional recorded stream experience.
Is It Possible to Livestream Pre-Recorded Videos on YouTube?
Yes, you can live stream pre-recorded videos on YouTube just like a real-time broadcast. This feature allows creators to present high-quality, pre-recorded content as a live event, maximizing engagement while maintaining full production control.
YouTube itself provides some native features like YouTube Premiere and Dashboard YouTube Live, but these options have limitations in customization and automation. To gain more flexibility and efficiency, many users rely on third-party streaming tools like YoloCast.
With YoloCast, creators can upload pre-recorded videos, schedule broadcasts, and automate the entire streaming process while ensuring seamless delivery. This allows businesses, influencers, and educators to maintain a consistent live-streaming schedule without being physically present.
Another major advantage is real-time audience interaction. Even though the video is pre-recorded, viewers can still engage through live chat, comments, and reactions, making the experience feel just like a real live event.
Additionally, YoloCast supports 24/7 live streaming, allowing creators to run continuous streams of pre-recorded content to keep their channel active and engaging. By using pre-recorded streaming, you can enjoy the best of both worlds: high-quality production and real-time engagement.
How to Stream Pre-Recorded Videos to YouTube from YoloCast?
Using YoloCast to stream pre-recorded videos on YouTube Live is an easy and efficient process. This method allows you to schedule, automate, and manage your live streams without the pressure of performing live. Below, we’ll walk you through the detailed steps to stream a pre-recorded video as a live event using YoloCast.
Step 1: Prepare Your Video
Before starting, make sure your video meets YouTube’s quality standards. Record your content in 1080p resolution for the best viewing experience. After recording, edit the video to remove any mistakes, enhance visuals, and optimize audio quality. Since pre-recorded videos allow full production control, take the time to create a polished final version.
Adding subtitles or captions is highly recommended to improve accessibility and increase engagement. Once your video is ready, save it in a YouTube-compatible format, such as MP4 or MOV, and ensure the frame rate is 30fps or 60fps for smooth playback.
Step 2: Upload the Video to YoloCast
Log into your YoloCast account and navigate to the Media Center, where all your media assets are stored. Click the ‘Upload’ button, select your pre-recorded video, and wait for the upload to complete. YoloCast will process the video and store it securely in its cloud-based system, ensuring stable and uninterrupted streaming.
Step 3: Add YouTube as a Streaming Destination
To connect YoloCast with YouTube, navigate to the ‘Destination’ page from the left sidebar in YoloCast. Click on ‘Add Destination’ and select YouTube Live.
During setup, a prompt will appear asking “Select what YoloLiv can access?”. Be sure to grant all required permissions, as this allows YoloCast to stream directly to your YouTube channel. Failure to enable these permissions may cause connection issues.

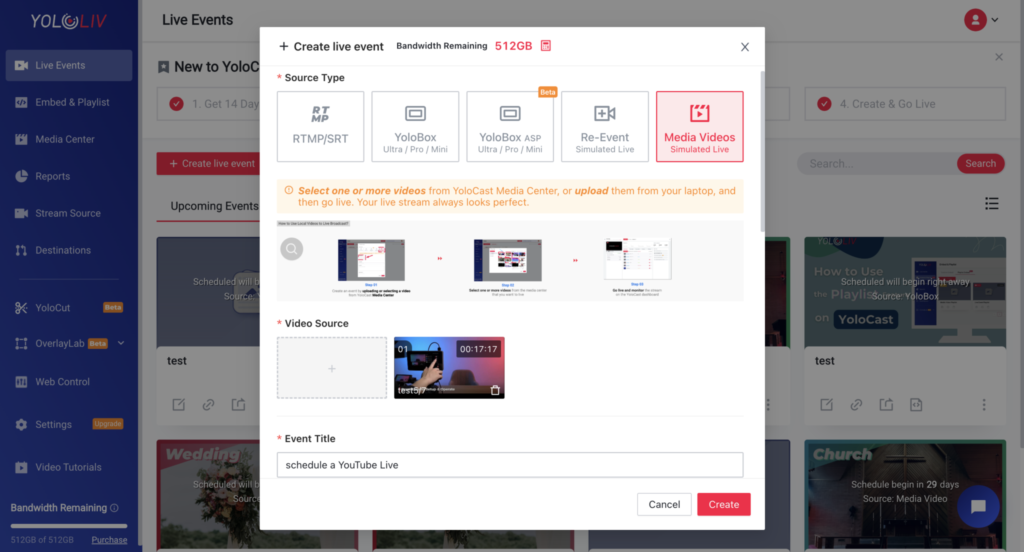
Step 4: Create a Live Event
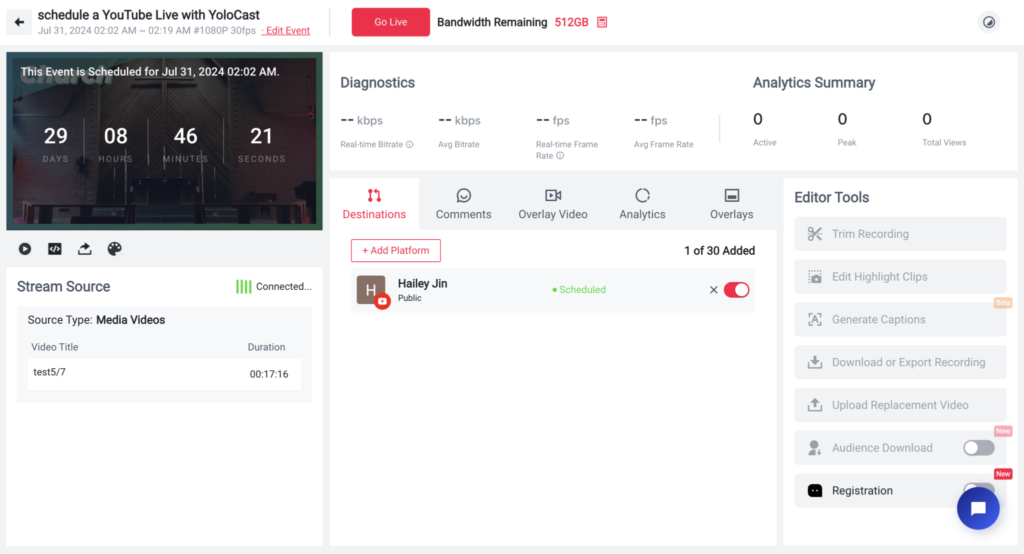
1)Once YouTube is set as the streaming destination, it’s time to create your live event in YoloCast. Go to the Live Events section and click ‘Create New Live Event’. Select Pre-Recorded Streaming as your stream type and choose the uploaded video from the Media Center.
If you plan to stream multiple videos in sequence, you can arrange up to 10 video files in the desired order. Next, add an event title, description, and scheduled start time. These details will appear on YouTube and can help boost discoverability.
After entering all details, confirm your settings and finalize your live event setup.
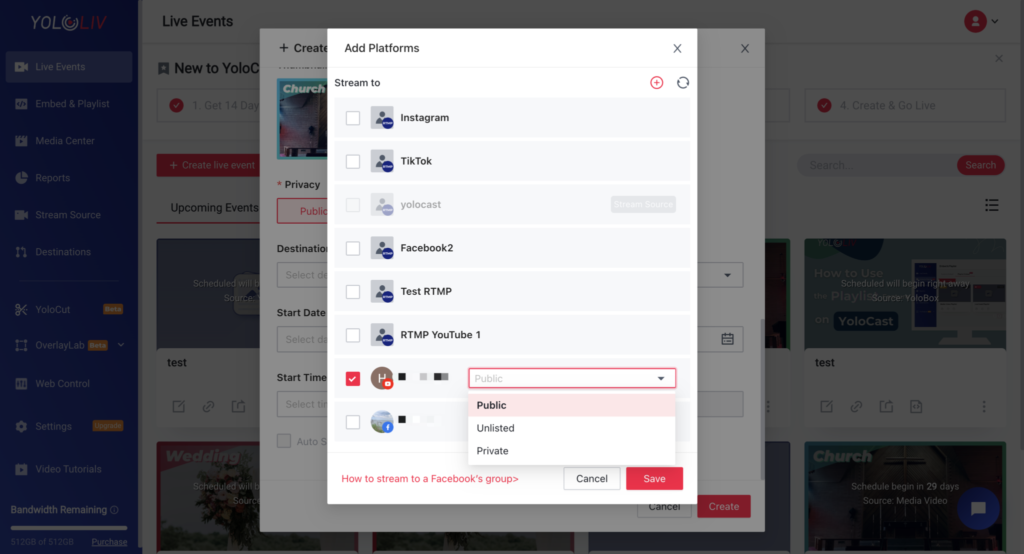
2)When selecting YouTube as your streaming destination, you are presented with three privacy options:
- Private: Only you or people you invite can view this stream. It will not be visible on your channel or searchable.
- Unlisted: Only individuals with the direct URL link can view the stream. Similarly, it won’t appear on your channel or be searchable.
- Public: The stream is viewable by everyone, appears on your channel, and is searchable.
To achieve the highest viewer engagement, we recommend streaming publicly. This way your live content can reach more viewers.
3)Specify the start time of your live stream and click to complete the creation. You can then find your upcoming stream under “Upcoming Events” on the YoloCast dashboard.
Step 5: Schedule Your Live Event on YoloCast
To complete the scheduling process, go to the Destination section in YoloCast and click ‘Schedule’. This ensures that YoloCast will automatically start streaming your recorded stream on YouTube at the designated time.
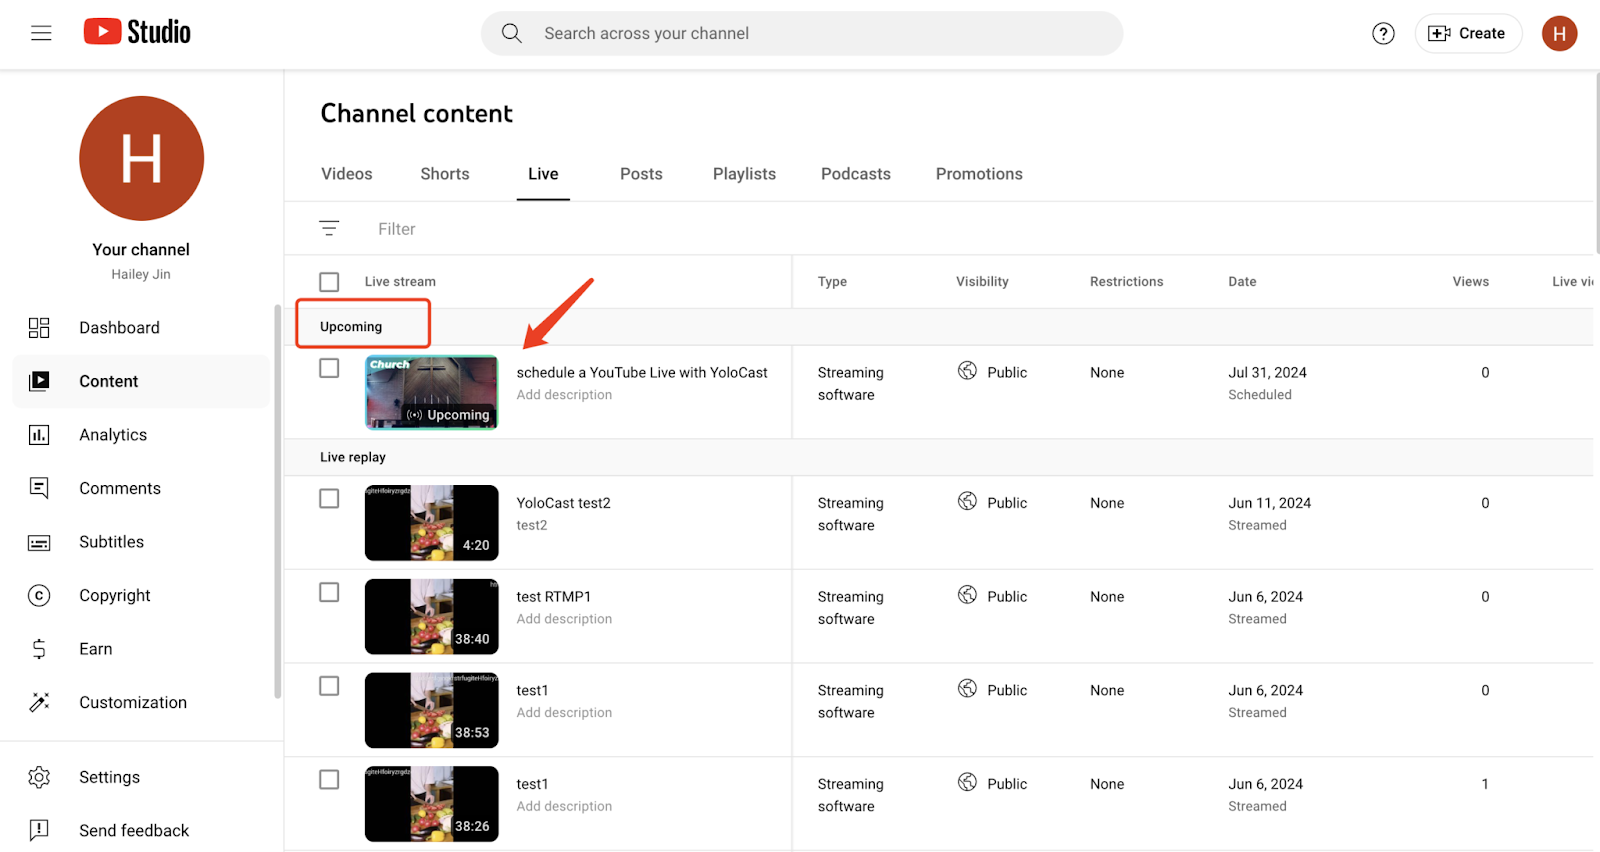
Step 6: Verify and Share Your Livestream on YouTube
To confirm that your scheduled YouTube broadcast is ready, visit YouTube Studio and navigate to the ‘Live’ tab. Here, you will find your upcoming live stream listed under ‘Upcoming Events’.
At this stage, you can copy the YouTube live stream link and share it with your audience via social media, email newsletters, or website embeds. If needed, you can also return to YoloCast and copy the live stream link from there for promotion.
Conclusion
By following these steps, you can easily schedule and stream a pre-recorded video as a YouTube Live event using YoloCast. This method is perfect for businesses, influencers, and educators looking to maintain a consistent live streaming schedule without the need to go live in real-time.
Whether you’re hosting a one-time event or setting up 24/7 live streaming, YoloCast ensures a smooth and professional YouTube streaming experience. Try it today and take full control of your YouTube Live broadcasts!
Please note: Live streaming with a pre-recorded video requires a YoloCast Exclusive or higher subscription. For 24/7 live streaming with a pre-recorded video, a Business plan is required. You can check out the plan details at YoloLiv Plan Comparison.
5,490 total views, 23 views today

Hailey, a Customer Success Specialist at Yololiv, she brings immense enthusiasm to assisting users in understanding the various features of YoloCast and resolving any usage-related issues they may encounter. Alongside her support efforts, she also curates articles sharing tips, troubleshooting advice, and other helpful insights to enhance users’ experience with YoloCast.