What Does Embedding Live Video Mean?
Embedding live video means adding a live stream to your website using the online video platform. After the embedding finishes, people who are visiting your website can watch the live video via the website video player.
For most websites, the video would show up as part of website content with the normal player functions like volume adjustment. And the process can be easily concluded in one step: copying and pasting the link or code for your live stream while editing the HTML for your own website.
One of the most popular ways to embed videos is through free platforms like YouTube. By copying and pasting a simple embed code, you can quickly add pre-recorded or live streaming content to your website. This method is cost-effective and easy to set up, making it accessible even for those with limited technical skills.
However, while YouTube and similar free tools offer convenience, they come with significant limitations when embedding live streaming video content. These constraints can affect the overall user experience and the control you have over your content.
Drawbacks to using YouTube for live stream hosting and embedding:
Advertisements: Embedded YouTube videos often display YouTube’s logo and advertisements. This can distract your viewers and may lead them away from your website to YouTube itself.
Limited Customization: YouTube’s embedded player offers minimal control over design and functionality. You can’t remove related video suggestions or fully customize the player to match your site’s branding.
Content Restrictions: YouTube enforces strict content guidelines. If your stream includes copyrighted music or sensitive topics, it may be taken down or restricted, disrupting your live event.
Ad Revenue Control: Any ads displayed on embedded YouTube videos generate revenue for YouTube, not for you. This limits monetization opportunities if you’re looking to capitalize on your live stream.
Quality and Stability: YouTube’s automatic quality adjustments can impact stream quality based on users’ internet connections, which may not be ideal for high-quality broadcasts.
To address these challenges, many businesses and content creators turn to professional video hosting platforms. These platforms offer more advanced features, such as customizable video players, ad-free streaming, and better content control. By using a dedicated hosting solution, you can provide a seamless and branded viewing experience for your audience, ensuring that your live streams reflect your brand identity and meet your specific needs.

The Benefits of Live Streaming to Your Website
How does it work to improve your enterprise? Here are some advantages you would get from having the live stream on your own website:
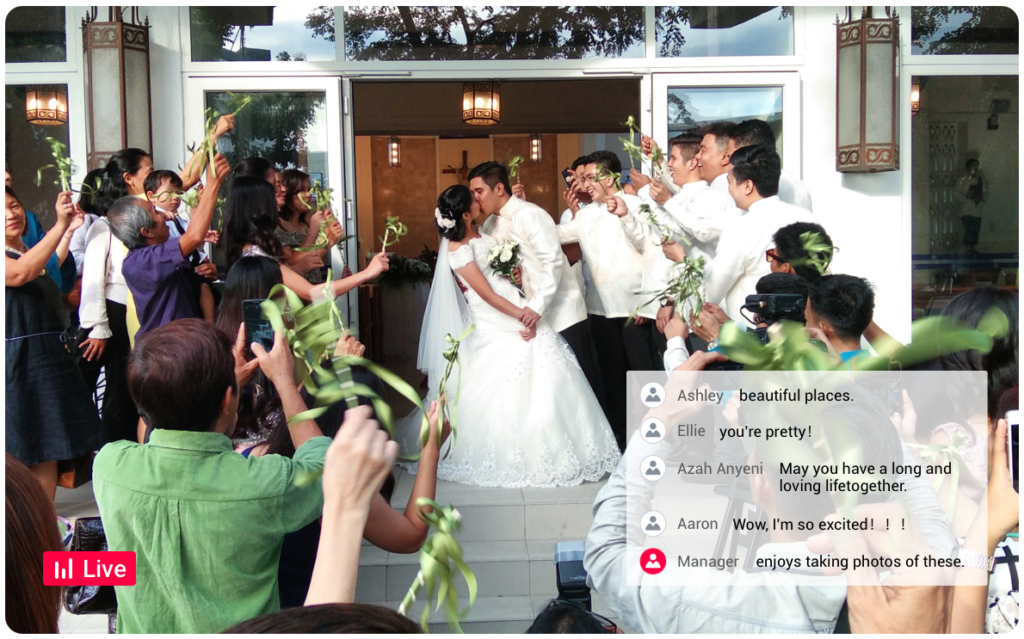
- Additional setup on the website to optimize the streaming content. With live steam only on the video platforms, you are limited in the display offered by the media platform. And within your own website, you can add articles, slides, graphic displays, and plugins as much as you want.
- Only one destination to your honest audience. You may use different platforms or stream from different social media. Jumping through different platforms would possibly lead to the loss of audience. So using your own website as the destination among all the social media would help you gather the target audience and provide the content they want to keep them.
- Have more engagement with your audience. The target to stream on different platforms is to collect more target people and let them visit your website. With embedding, you can directly achieve the goal to make them see the other content you prepared while streaming. It also helps people to step closer to you.
- Easier to be found under Search Engine Optimization. With both video and text available, it is easy to rank your website with similar keywords.
How to Embed The Video on Your Website
#1 Choose The Platform
To startup from the beginning, you need to choose the original streaming platform for embedding. Here we use the YoloCast, a new stream platform provided by Yololiv for content creators.
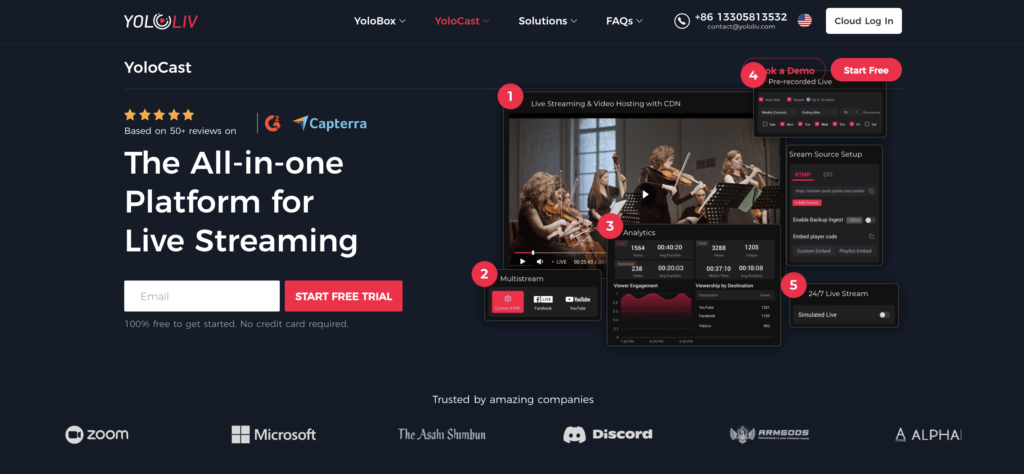
YoloCast is an all-in-one live streaming platform that gives you more control than ever to deliver professional live videos and engage your audience. You can host, monetize, and broadcast with a superior viewing experience. With 4 different plans available, you can choose it by comparing these plans with the various functions provided in each plan.
- The basic function in the starter plan includes Automated Scheduling, Multi-Streaming to different platforms simultaneously, Simulated Live, and Concurrent Broadcasts.
- While in the professional plan which has all the functions below, you can also stream 3 events concurrently, and enjoy up to 1080p video resolution. Streaming to your website with the embedding code would be available and it also offers video monetization.
- Business Plan is the most picked plan on the platform. In addition to what the processional plan has, the Business plan can stream 5 events concurrently. The maximum stream duration is 24h and you can add scoreboard overlay and automated captioning on the video. It also offers a higher frame rate which is up to 60fps for live streaming. Automated captioning makes the content clearer while speaking and Video Trimming reduces the time for you to repurpose the video.
- The exclusive plan is the most budget-friendly plan on the platform. It includes almost all the features of the business plan except 24/7 live streaming with simulated live.
If you’re unsure which plan is right for you, check out their detailed guide here: Your Ultimate Guide to YoloCast Plans. Choosing a platform like YoloCast ensures that your embedded videos look professional and run smoothly, enhancing your website’s user experience.
#2 Create The Live Stream
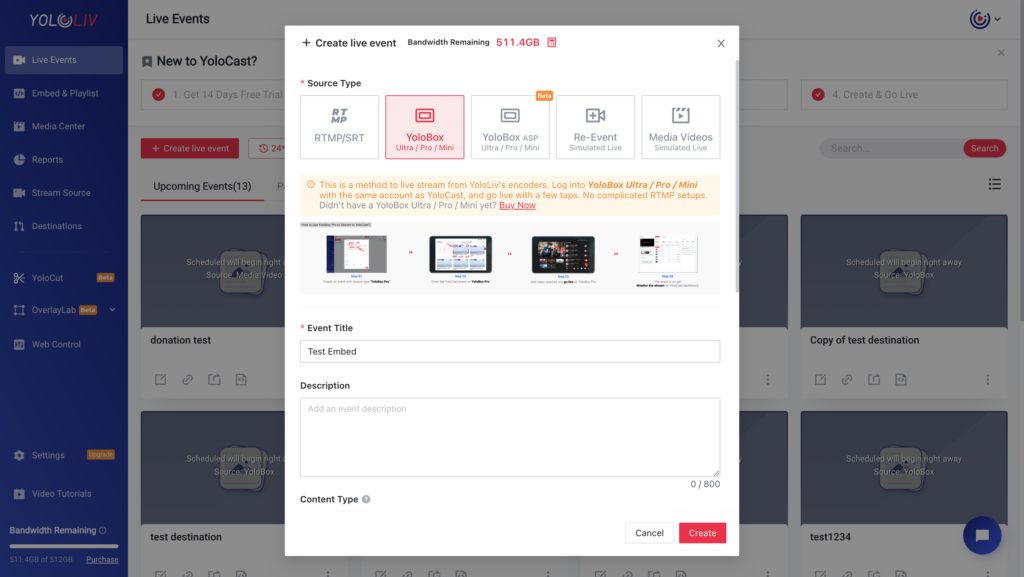
After the platform choice, you need to create a live event in YoloCast with the necessary information, like the title, thumbnail, video quality, beginning time and etc. Be careful with these since you cannot change them once you finish creating.
#3 Generate An Embed Code
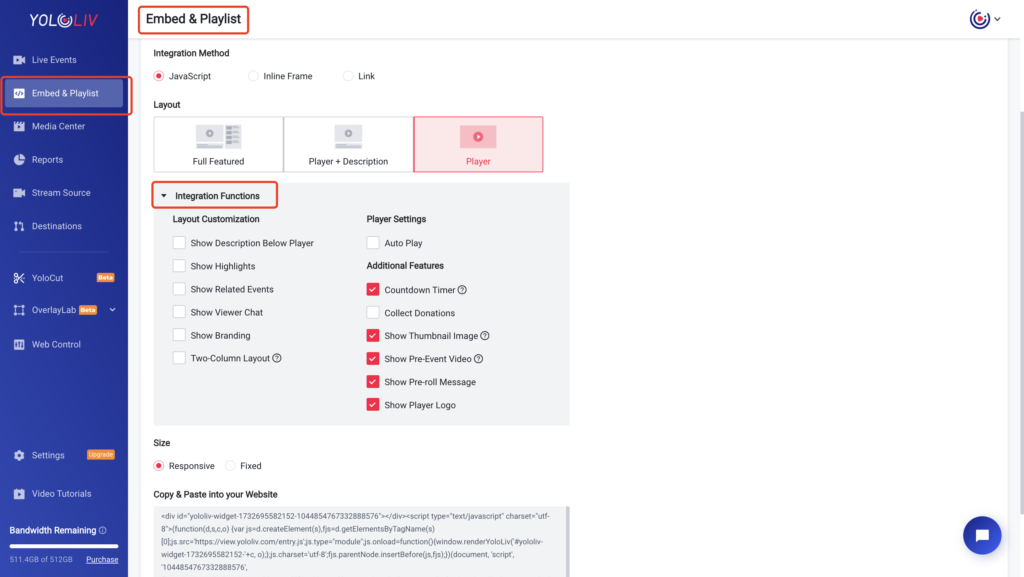
In the menu, you would find the “Embed&Playlist” option which is specially provided for users who want to get the embed code. It provides various options for you to adjust the final display you want to see on your own website, even with Integration Functions for the layouts displaying/hiding. In the end, there is also a preview button for you to check the adjustment result.
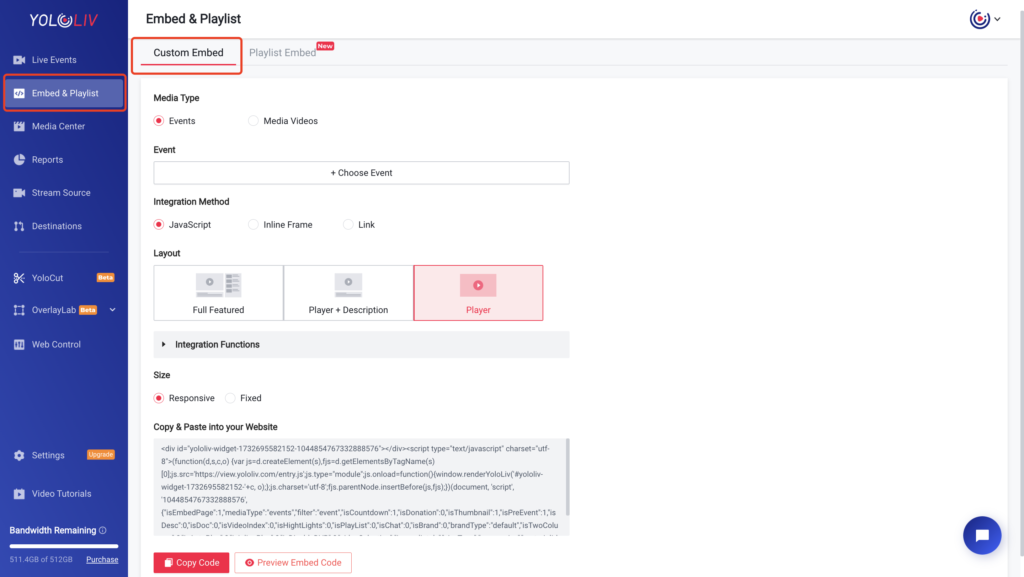
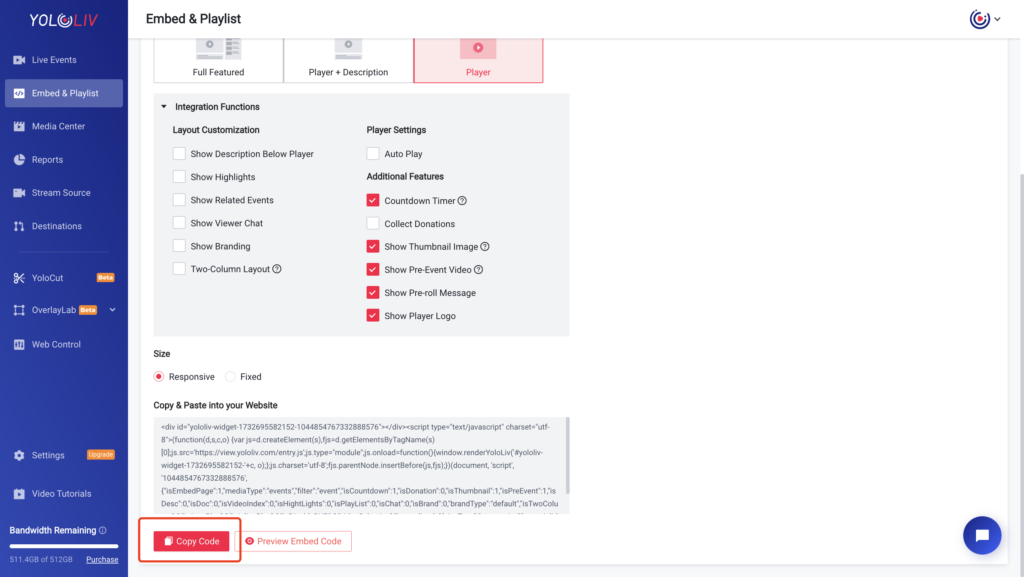
And when you are ready, you can copy the code from the final part of the page.
#4 Paste And Save
Finally, find the place on your site where you’d like to embed the video player. Open the HTML editor, and paste the embed code that you copied from YoloCast. Different systems and websites may have different types of displays, and here is only an example we have of what it looks like.

#5 Recheck By Third-view
It is always worth a recheck when all the things are set. Open the website as a visitor to regard yourself as a stranger. You can also invite your friend or some close fans to preview it and share your opinion. And after the changes are made, preview it to make sure the code is working correctly to achieve the display you want.
How to Embed Streaming Video on Popular Website Builders
Embedding live streaming video on popular website builders like WordPress, Wix, Squarespace, and Shopify is a straightforward process. Each platform offers unique tools and methods to ensure a seamless integration, enhancing the user experience and keeping your audience engaged. Let’s explore how to embed live streams on these platforms using essential tools and techniques.
WordPress
To embed a live stream on a WordPress site, you can use either custom HTML or specialized plugins.
Using Custom HTML:
- Generate the embed code from your live streaming platform (e.g., YoloCast).
- Go to the WordPress editor and add a “Custom HTML” block.
- Paste the embed code into the block.
Using Plugins:
- Install and activate plugins like Video Embed & Thumbnail Generator or Embed Live Stream Widget.
- Configure the plugin settings to customize the player’s appearance and functionality.
- Add the live stream to your page using the plugin’s shortcode or widget.
Wix
On Wix, embedding a live stream involves adding an HTML element to your page:
Using HTML Element:
- Go to the Wix Editor and select “Add” > “Embed a Widget.”
- Paste the streaming video embed code into the HTML box.
- Adjust the size and position of the widget to fit your page layout.
Advanced Options:
- Wix offers integrations for platforms like Facebook Live and Twitch.
- For audio content, use tools like audio video streamers to enhance the multimedia experience.
Shopify
If you’re working with Shopify, you can embed live streams by adding the code directly into your theme’s HTML or using the “Custom HTML” section in the page editor:
Using Theme HTML:
- Add the live stream embed code directly into your theme’s HTML.
- Alternatively, use the “Custom HTML” section in the page editor.
Using Apps:
- Shopify offers apps that enhance live streaming capabilities.
- Ensure a smooth integration with minimal effort.
FAQs for Embedding
#1. What’s the difference between the three types of embed codes?
There are three types of embed codes available: link, JS (Javascript), and iframe. We recommend using the JS embed code because it’s more universally compatible with the full-screen feature. iFrame embed code is more compatible with and/or required for some frameworks, including WordPress and WIX. And link can be used for sharing the stream.
#2. What would it show when I am not streaming?
It depends on the event settings you choose when building. If you choose the Live-Only option on the final confirmation, the embedded video would show an offline notification when the event ends. If you did not choose the option( it is not chosen in default), the replay of the event would be displayed on the website and repeated until you start the next stream.
#3. Is it possible to embed a live stream on a WordPress website?
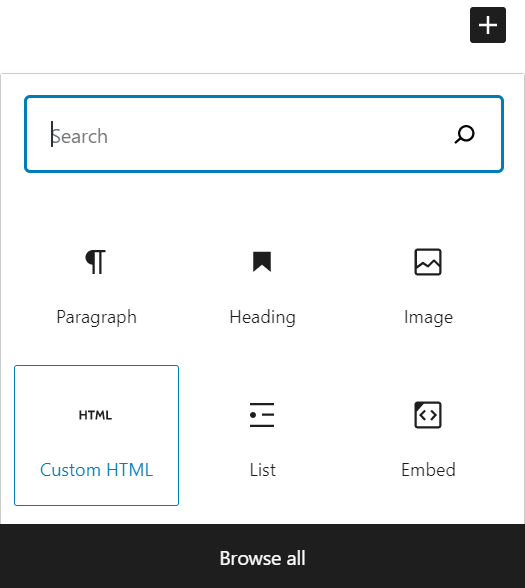
Yes, you can use the same code to embed live streams on your WordPress site. Add the new block and choose Custom HTML to insert the code. Then when publishing, you will have the streaming video displayed on the WordPress website.
#4. Can I embed it after the streaming starts?
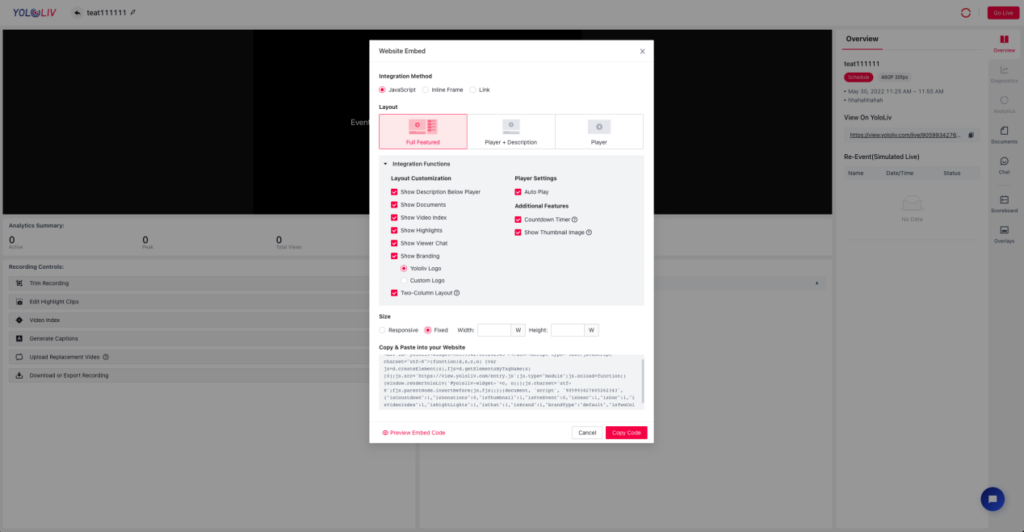
Yes of course! There is also an embed option on the live streaming page to promote the event. Click the embed icon and you would have similar settings with the Embed option in the background.
#3. How Much Bandwidth Do You Need When Embedding a Video on Your Website for Your audience to watch?
Bandwidth refers to the amount of data transmitted over an internet connection within a specific timeframe. For YoloCast users embedding live streams on their websites or sharing event links directly via the YoloCast player, bandwidth consumption is a crucial consideration. However, if you stream your live events to third-party platforms like Facebook or YouTube via YoloCast, this activity does not count toward your YoloCast bandwidth allocation.
Factors Affecting Bandwidth Usage with YoloCast
Bandwidth usage depends on several factors, including:
- Streaming Frequency: How often you host live events.
- Stream Duration: The length of each live stream.
- Viewer Count: The number of concurrent viewers watching the stream.
Since specific information about your streaming habits is necessary to calculate exact bandwidth needs, general estimates are used as a guideline.
General Bandwidth Usage Estimate
YoloCast uses a default bitrate of 3.5 Mbps for live streams. As a general rule of thumb, if you stream once a month for 60 minutes, each viewer will consume approximately 2 GB of bandwidth.
If you stream just once a month, the total bandwidth usage will largely depend on the number of viewers and stream duration. For example, 100 viewers watching a 1-hour monthly stream would consume approximately 200 GB in total.
Please note: Actual bandwidth usage may exceed the theoretical values by approximately 10% or so.
Accurate Bandwidth Estimation with YoloCast
To get a more precise estimate tailored to your specific usage:
- Log in to your YoloCast account.
- Navigate to the ‘Settings’ section.
- Click on the calculator icon available on the ‘Plans’ page.
- Input details like expected stream duration, frequency, and viewer count to receive a customized bandwidth projection.
Please note: Actual bandwidth usage may exceed the theoretical values by approximately 10% or so.
Wrap Up
Embedding the live stream to your own website can be easy and simple with the well-preparation from YoloCast. Just copying and pasting the code would open a new window for your work. It will also aggregate and utilize the resources you have in a more efficient way for your audience.
YoloLiv’s new cloud platform was just released, and it’s now offering an unprecedented promotion on all plans. Come and join us with a 14-day free trial at dashboard.yololiv.com to start streaming!
Cerise is a support specialist at YoloLiv with three years of experience working as a Customer Support Specialist in the consumer electronics industry. She also produces articles including video productions, tips and tricks and expert knowledge in the audiovisual industry.

